
This section explains how to configure a virtual data source using the Easysoft ODBC-SQI SQL Engine and how to connect to a virtual data source from an ODBC-compliant application.
An exercise is provided which takes you step-by-step through configuring a virtual data source which joins local and remote data sources and then executing SQL queries on this virtual data source.
You can create two types of data sources: user data sources and system data sources:
It is possible to create a virtual data source that includes some user data sources, but if you do this, be aware that connecting to the virtual data source will fail if you are not logged in as the appropriate user.
If you are using the Easysoft ODBC-ODBC Bridge or the Easysoft JDBC-ODBC Bridge to implement cross-platform data access, you should first use those products to configure data sources connecting to the remote data.
Once those data sources are configured and proven to be connecting to the remote data, you can include them in a virtual data source.
Please refer to the documentation provided with the Easysoft ODBC-ODBC Bridge or the Easysoft JDBC-ODBC Bridge for details of connecting to remote data.
The Easysoft ODBC-SQI SQL Engine provides a mechanism to avoid any conflicts that might arise if you combine two or more data sources into one virtual data source and the same table name is used in more than one of the back-end data sources.
For example, imagine that a company has two offices (one for the northern region and one for the southern region) and both offices use the same database structure:
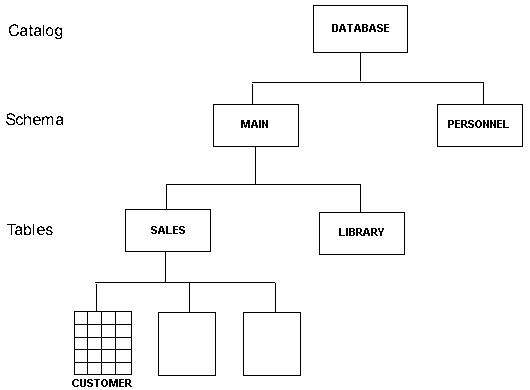
Each database is split into two catalogs: MAIN and PERSONNEL.
The MAIN catalog contains two schemas: SALES storing all sales information, and LIBRARY containing details of all books and software held at that office. The SALES schema contains multiple tables including the CUSTOMER table which contains details of all the customers at that office.
Catalogs and schemas are levels in the containment hierarchy of a database's structure. A database can contain one or more catalogs; each catalog can contain one or more schemas; each schema can contain multiple tables.
When the two offices merge together, their individual databases are combined into one virtual data source but there needs to be some way of distinguishing between, for example, the customers at each office. With the Easysoft ODBC-SQI SQL Engine you can do this using link names.
A link name is prefixed to the catalog name of the data source, ensuring uniqueness for each back-end data source. You can then reference a specific table using the following name syntax:
link_name.catalog_name.schema_name.table_name
For example, if the link names NORTH_OFFICE and SOUTH_OFFICE were created, you would reference the CUSTOMER table in the northern office's database using:
NORTH_OFFICE.MAIN.SALES.CUSTOMER
You might not need to include the catalog and schema names if the back-end DBMS does not require them. If this is the case, you can use the following syntax to reference a specific table:
So if you wanted to select the records of all customers in the northern office's database, the SQL statement would be:
SELECT * FROM NORTH_OFFICE...CUSTOMER
If you know that a table is unique within the virtual data source, there is no need to include the link name when referencing that particular table.
This section provides instructions for configuring and connecting to virtual data sources:
The Easysoft ODBC-SQI SQL Engine can connect to any local ODBC data sources set up on your machine or any remote data sources that you are connecting to via the Easysoft ODBC-ODBC Bridge or the Easysoft JDBC-ODBC Bridge.
In Windows, your data sources are managed using the ODBC Data Source Administrator.
To configure a virtual data source:
1. Select Start > Settings > Control Panel, double-click Administrative Tools and then Data Sources (ODBC).
| Select Start > Settings > Control Paneland double-click ODBC Data Sources (32bit). |
| Select Start > Settings > Control Paneland double-click Data Sources (ODBC). |
The ODBC Data Source Administrator dialog box is displayed:
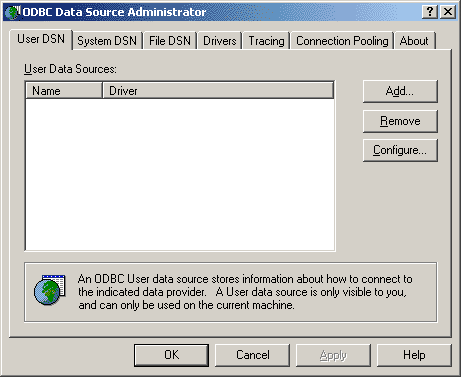
2. Select the User DSN tab to create a data source which is only available to the user who is currently logged into this Windows machine.
Select the System DSN tab to create a data source which is available to any user or service that logs into this Windows machine.
3. Click Add... to create a new data source.
The Create New Data Source dialog box lists the drivers available:
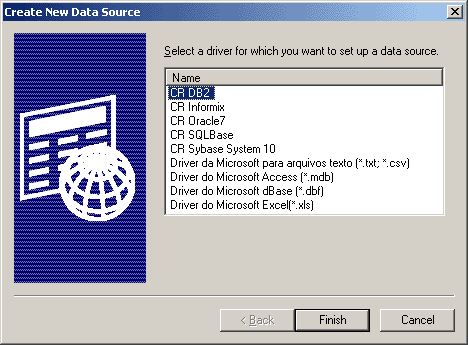
4. Select Easysoft SQL Engine and then click Finish.
The Easysoft ODBC-SQI SQL Engine DSN configuration dialog box is displayed.
The Easysoft DSN Setup dialog box has two tab folders:
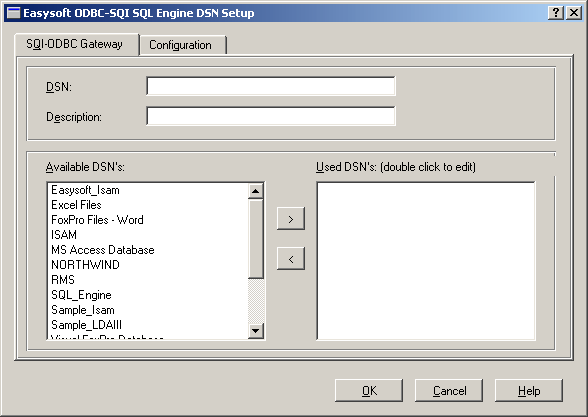
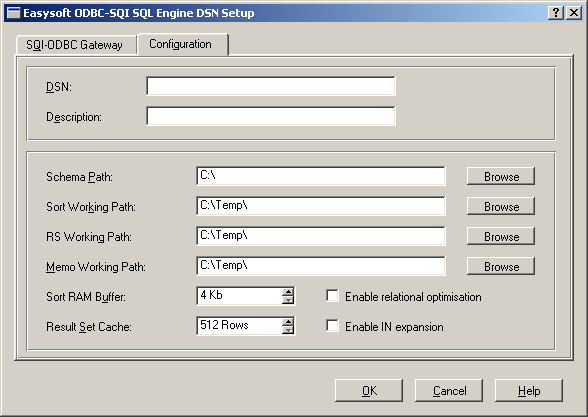
5. On the SQI-ODBC Gateway tab, enter a name and description for this virtual data source.
To add an ODBC data source to this virtual data source, click the data source in the Available DSNs list so that it is highlighted (or selected), and then click -> to move it into the Used DSNs list.
To deselect a data source in either the Available DSNs or Used DSNs list, click it again so that it is not highlighted.
To remove an ODBC data source from this virtual data source, select it in the Used DSNs list then click <-.
Once a data source is listed in Used DSNs, you can override any authentication settings on the data source, and change additional settings. To do this, double-click the data source in the Used DSNs list. The DSN Properties dialog box is displayed.
6. On the Configuration tab, enter a name and description for this virtual data source if you have not already specified these details on either of the other tabs.
This tab stores paths of temporary directories and some memory settings. Normally the default settings will be acceptable, but you can change them if necessary.
7. Click OK to create this virtual data source.
You can now connect to this data source via ODBC-compliant applications such as Microsoft Access.
| Because of limitations within Microsoft Access, if your virtual data source contains any Microsoft Access data sources, you will not be able to connect to the virtual data source from Access. |
The following steps explain how to connect to a virtual data source from Easysoft iSQL, but you could use any ODBC-compliant application on your machine.
| iSQL is currently available from Easysoft as beta software. If you would like a copy of this tool for connecting to and querying ODBC data sources, please contact sales@easysoft.com. |
If you choose to use an ODBC-compliant application other than Easysoft iSQL, refer to the documentation supplied with that application for details of connecting to a data source.
1. Select Start > Program Files > Easysoft > Easysoft iSQL.
The Easysoft iSQL program window opens.
2. Click the + alongside Drivers to expand the list of drivers available.
3. Click the + alongside Easysoft ODBC-SQI SQL Engine to view the data sources configured using the Engine.
Data sources can be User or System data sources. Click the + alongside the User or System label to view the data sources of that type.
4. When you can see the data source that you want to connect to, double-click on it. The status line shows `connecting to data source'.
5. Once the connection has been made, to view a list of the tables in this data source, click Show Tables.
6. When the SQL Tables dialog box is displayed, click OK without changing any of its settings.
The tables are listed in the lower half of the right-hand pane.
7. Type your SQL statement into the upper half of the right-hand pane. For example, to view the contents of a table, type:
where tablename is the name of a table in the data source.
8. To execute the SQL statement, click Execute Query.
The results are displayed in the lower half of the right-hand pane.
For more examples of writing SQL statements, work through the A Sample Exercise.
This exercise takes you through configuring a virtual data source which joins a local data source and a remote data source, then executing SQL queries on the virtual data source to query both back-end data sources as though they were one.
When you install the Easysoft ODBC-SQI SQL Engine, a sample data source called SQL_Engine is created, which connects to an Easysoft database on the local machine.
Because there is no way of knowing what remote data sources you might have, this exercise will connect to a remote data source on a server at Easysoft.
To do this, you must install the Easysoft ODBC-ODBC Bridge client component (which is free) on your local machine, and accept the option to create the DEMO data source at the end of the installation.
You can download the Easysoft ODBC-ODBC Bridge from the Easysoft ODBC-ODBC Bridge page at http://www.easysoft.com (you will be prompted to log into the web site if you are not currently logged in).
Once the Easysoft ODBC-ODBC Bridge client is installed and the DEMO data source is set up, check that you can connect to the DEMO data source before proceeding with the following exercise.
If you cannot connect to the DEMO data source, you will not be able to complete this exercise.
Information about installing and setting up data sources for the Easysoft ODBC-ODBC Bridge is available in the manual as HTML or PDF format from the Easysoft ODBC-ODBC Bridge Documentation page on the Easysoft web site at http://www.easysoft.com.
Before proceeding, ensure that the SQL_Engine data source and the DEMO data source are correctly set up on the local machine.
To create the virtual data source:
1. Open the ODBC Data Source Administrator (see Configuring a virtual data source for further information).
2. On the System DSN tab, click Add.
3. Select the Easysoft ODBC-SQI SQL Engine driver and then click Finish.
The Easysoft DSN Setup dialog box is displayed.
4. On the ODBC Gateway tab, type Virtual DSN Test in the DSN box.
5. Select the DEMO data source in the Available DSNs list and then click > to move it into the Used DSNs list.
6. Double-click on DEMO in the Used DSNs list.
7. Specify the following values in the DSN Properties dialog box:
| Target DSN | demo |
| Target UID | demo |
| Target Password | easysoft |
9. On the Easysoft RDBMS tab, select the Enable Easysoft DB option and set both the Schema Path and Data Path to point to the location of the sample files which is \Program Files\Easysoft\Easysoft SQL Engine\Demo by default.
10. Click OK on the Easysoft DSN Setup dialog box and then click OK to close the ODBC Data Source Administrator.
In this part of the exercise the Easysoft iSQL utility will be used to query the virtual data source that you have set up.
1. Select Start > Program Files > Easysoft > Easysoft iSQL.
2. Click the + symbol alongside Drivers - Easysoft SQL Engine - System.
You should be able to see the Virtual DSN Test data source and any other system data sources that you have configured using the Easysoft ODBC-SQI SQL Engine.
3. Double-click on the Virtual DSN Test data source.
The status line shows `connecting to data source'.
4. Once the connection has been made, click Show Tables to display a list of the tables in this data source.
5. Click OK on the SQL Tables dialog box without changing any settings.
The tables are listed in the lower half of the right-hand pane.
The TABLE_CAT and TABLE_SCHEM columns identify the 'back-end' data source to which a table belongs:
The DEMO data source contains a database of book sales and the SQL_Engine data source contains a database of product sales.
The two data sources are unrelated.
Normally your data sources will have something in common which will be why you want to query them heterogeneously.
6. Type the following SQL statement into the upper half of the right-hand pane.
7. Click Execute Query in the iSQL toolbar to execute this statement.
A list of book sales in the DEMO data source is displayed.
Notice that the title_id is shown but book titles are not shown because that information is not stored in the sales table.
8. To include book titles in the results, type:
select sales.*, titles.title from sales, titles
where sales.title_id=titles.title_id
Remember to click Execute Query.
This SQL statement says 'display all columns in the sales table, and the title column from the titles table, where the title_id number is the same in both the sales and titles tables'.
The same results are returned, but this time book titles are included.
9. To view a list of orders in the SQL_Engine data source, type:
10. To make this query more specific by querying for orders since January 1, 1998, type:
select * from sample.orders where
Now only 129 records are returned.
The two back-end data sources have now been queried separately.
11. To run a query to see if any orders were placed on the same date in both data sources, type:
select distinct sales.ord_num, sales.ord_date,
orders.o_orderkey, orders.o_orderdate from sales,
sales.ord_date=orders.o_orderdate
21 records are returned, confirming that 21 orders were made on the same date in both data sources (using distinct ensures that only unique records are returned).
As the two data sources are unrelated, there is little else that can be queried on them heterogeneously. In reality, your back-end data sources will probably have more in common and you will be able to construct detailed SQL queries to select exactly the data you want.
12. Close iSQL unless you want to continue typing further SQL queries.
| You can query a virtual data source from within Microsoft Excel by using the Data > Get External Data > New Database Query command, which displays the Choose Data Source dialog box. Select the virtual data source that you want to query and then click OK. At this point, an error message saying that the selected data source contains 'no visible tables' is sometimes displayed. To fix this, click Options on the Query Wizard screen to display the Table Options dialog box. Turn the System Tables option OFF if it is currently ON, or ON if it is currently OFF, and press OK. The tables in your virtual data source are then listed on the Query Wizard screen. |