Accessing Oracle Database XE by using the Easysoft Oracle ODBC driver
Contents
- Introduction
- Prerequisites
- Installing Oracle Database XE on Windows
- Installing the Oracle Instant Client on Linux
- Testing the connection with SQL*Plus on Linux
- Installing the Easysoft Oracle ODBC driver
Introduction
The Easysoft Oracle ODBC driver lets you access Oracle Database Express Edition (Oracle Database XE) from applications that support ODBC running on Linux, UNIX, and Windows. For example, access Oracle Database XE from a PHP script running on Linux.
Prerequisites
- Two networked machines visible to each other: one running Microsoft Windows one running Linux.
- Oracle Database XE for Microsoft Windows. This is available for download from Oracle.
- Oracle client software. Download and install either Oracle's full client libraries or the Instant Client.
Check that your Linux system's glibc version is supported by the Oracle client by running:
/usr/lib/libc.so.6
The first line of the output contains the glibc version. If the libc shared object is i na different location to
/usr/lib, alter the path accordingly. - The Easysoft Oracle ODBC driver. Choose the same platform as that of the Oracle client software.
You need root permissions for the Easysoft install.
Installing Oracle Database XE on Windows
After you have downloaded the Windows distribution from Oracle, you'll have an executable named OracleXE.exe.
Run the executable, create a password for the system and accept the defaults throughout the install.
Make sure your database has started correctly.
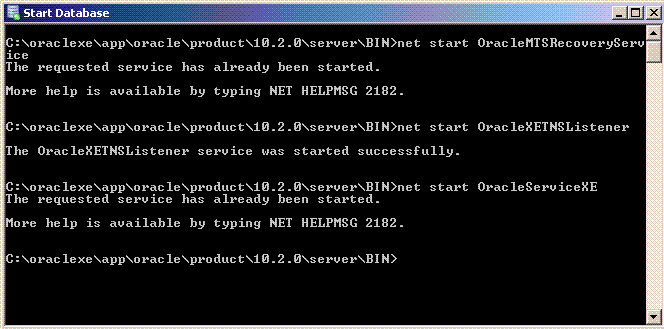
To do this, choose Start Database in the Oracle Database XE group in the Windows Start menu.
A Command Prompt displays:

If the Command Prompt contains "the service was started successfully" you can now connect to your database by using the SQL*Plus tool.
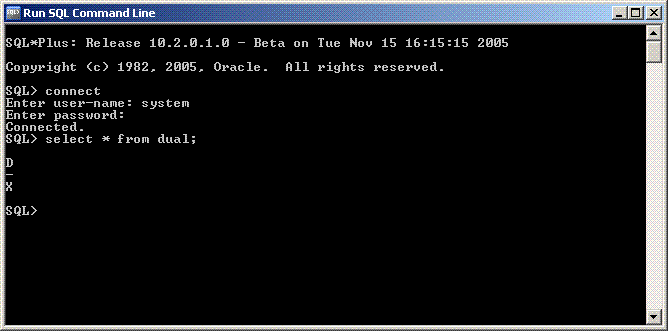
To run the SQL*Plus command line tool, choose Run SQL Command Line from the Oracle Database XE Start menu group.
You should now be presented with an SQL prompt, from here, type connect. It will then ask you for a user name and password. The user name is system and the password is the one you created during the install.

You can now try a simple query:
select * from dual;
We now know that the database is fully operational and we can retrieve data.
Oracle sets the Service (SID) to XE in the tnsnames.ora file:
XE =
(DESCRIPTION =
  (ADDRESS = (PROTOCOL = TCP)(HOST = SERVERNAME)(PORT = 1521))
  (CONNECT_DATA =
    (SERVER = DEDICATED)
    (SERVICE_NAME = XE)
  )
)
The values of SERVICE_NAME, HOST, and PORT are used later in configuring an ODBC DSN on your Linux client machine, so it may be worth making a note of these values now.
Installing Oracle Instant Client on Linux
Download and unzip the Linux Instant Client distribution, for example:
cd /usr/lib
unzip instantclient-basic-linux.x64-23.4.0.24.05.zip
(You may need to log in as root to do this in /usr/lib. Exit the root user account after you have unzipped the file.)
This creates a Instant Client directory in /usr/lib. This is all you need to do for the client install!
Testing the connection with SQL*Plus on Linux
Set your LD_LIBRARY_PATH to point to your instant client dierectory. For example:
LD_LIBRARY_PATH=$LD_LIBRARY_PATH:/usr/lib/instantclient
export LD_LIBRARY_PATH
cd to your Instant Client directory and then enter the following command:
./sqlplus user_name/password@//server_name:1521/database_name
You should be now presented with an SQL prompt where you can execute SQL commands to your database:
SQL>select * from dual;
At this point you now know that your database is set up correctly and you can retrieve data from it.
Installing the Easysoft Oracle ODBC driver
Download the Easysoft Oracle ODBC driver
After you have downloaded the ODBC driver from Easysoft, place it somewhere on your Linux machine to be untarred. For example, /tmp.
Now untar the distribution and cd to the newly created directory.
As the root user, run the install:
# ./install
After you have accepted the license agreement, accept the defaults throughout the install.
After you have been through the licensing procedure (request a trial license), the next step is to set up a data source (DSN) to connect to your newly created Oracle database.
The following section creates an Oracle data source based on the information entered at the following prompt.

The created data source will be called 'ORACLE';.

Enter the Oracle Database Name (i.e. test.server): XE
Enter an Oracle user name (i.e. system): system
Enter the Oracle password for system: your_password
After you have followed these steps, you can now accept the default answers through the rest of the install. After the install completes, exit out of the root user account.
Now that the installation is finished, you can now have a look at your DSN setup just to make sure everything is correct. This can be found in /etc/odbc.ini and it should look like this:
[ORACLE]
Driver          = ORACLE
Database                = //your_server:1521/XE
User            = system
Password                = your_password
METADATA_ID             = 0
ENABLE_USER_CATALOG             = 1
ENABLE_SYNONYMS         = 1
You now need to set your LD_LIBRARY_PATH to point to the Oracle client:
# LD_LIBRARY_PATH=$LD_LIBRARY_PATH:/usr/lib/instantclient
# export LD_LIBRARY_PATH
Now we are ready to make a connection to the database. Run the following command.
# /usr/local/easysoft/unixODBC/bin/isql -v ORACLE
This should now take you to an SQL prompt where you can execute a query:
+---------------------------------------+
| Connected!                            |
|                                       |
| sql-statement                         |
| help [tablename]                      |
| quit                                  |
|                                       |
+---------------------------------------+
SQL>select * from dual;
+------+
| DUMMY|
+------+
| X    |
+------+
1 rows returned
SQL>
